3 V-Sit Variations To Supplement Your Training
The purpose of this article is to explore 3 V-sit variations that I used to unlock my V-sit.
The V-sit. What can I say? It's the move that started it all for me in the world of calisthenics skills. I think the first time I saw a V-sit was either by Andrea Larosa or Joachim Hilderson in early 2020. And what I saw were legs that were magically perpendicular to the ground, with epic-locked knees hovering soooo close to their nose. I had never seen such a thing and I knew instantly that that's what I wanted to achieve and I would stop until I did. This drove me down a 2-year path, training my V-sit every single week without fail, and trialing a variety of exercises along the way until I achieved the V-sit I was dreaming about.
I often see people on their V-sit journey using only what I like to call, the brute force method. It basically means training towards the full V-sit using only the V-sit itself. Always holding for max time, and never training any variations. While this method can definitely work for some people, I find it somewhat limiting. A max-effort V-sit will be more taxing on the nervous system but less taxing on the muscular system. Both are needed to unlock the full position. And since training the full position will take up a percentage of the journey by default, a more tactical approach would be to include variations that allow work to be performed at an intensity that's about 75-90% of our max effort. This will provide us with the stimulus needed for the specific muscular adaptations we're looking for to take place.
The V-sit fundamentally consists of 3 components: tricep extension strength, hip flexor strength, and hamstring flexibility. I'm a firm believer that each of these elements should be trained individually in order to achieve that impeccable, easily identifiable, epic V-sit, but we'll save that for another article. In this article, we'll be covering 3 variations that will work each of the 3 components mentioned above directly using the V-sit. The variations below are by no means an exhaustive list or the end all be all of V-sit exercises. There's more than one road to the V-sit and we'll all have our own unique path. However, each of the variations below are variations that I've used on my journey.
1) Banded V-sit
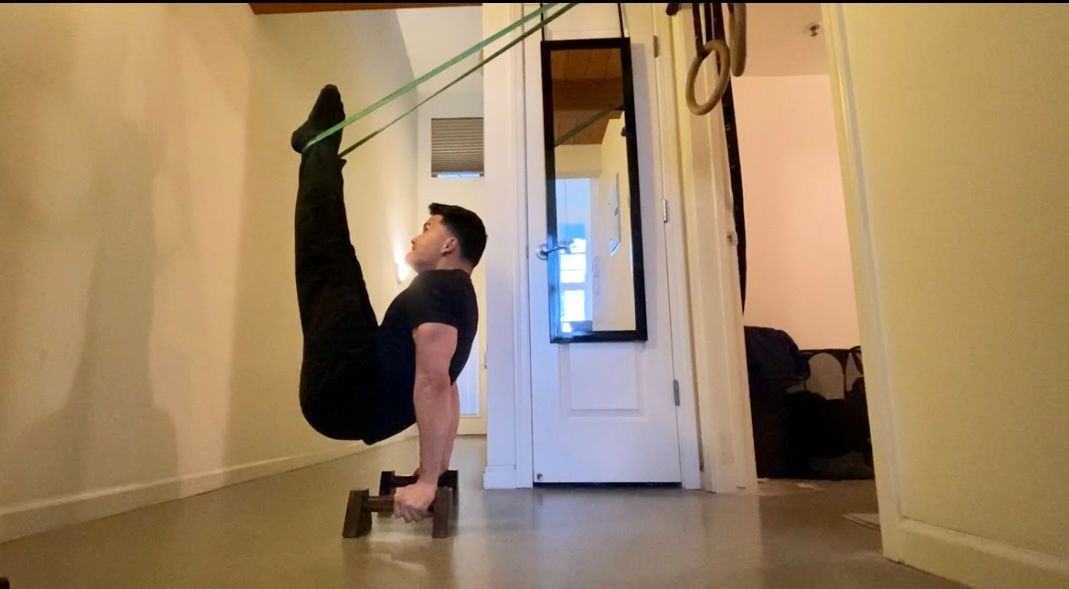
One of the biggest challenges with the V-sit is learning how to get the hips as far forward and high as possible. Notice in the picture below how my hips are in front of my torso and higher than if I were to be sitting in an L-sit. They're almost in front of my parallettes. In order to get the hips into a similar position, it takes a serious push of the earth. I often cue students to "push the ground away" to encourage a stronger drive of the hands into the ground. But regardless, it's very difficult to push through the ground with sufficient force to get the hips so high. It's a huge demand for our triceps and hip compression.
This is where the banded V-sit comes in. The banded V-sit was the first variation that really gave me a taste of how my body should feel in the full position. It was glorious and gave me a glimpse of hope that one day it'll be mine. I like to use this variation to teach two things. One, to teach the body how to position the hips nice and high, and two, to teach the triceps just how hard they need to contract in order to keep the hips in this high position.
Many of us have not conditioned our triceps to be able to exert a near max-effort isometric contraction in shoulder extension. This is why V-sits can be so crampy in the triceps for many people. Because of the lower intensity from the band, this variation allows us to get into more shoulder extension than without assistance. This is key. It's a great way to force the triceps to adapt to having to contract isometrically so strongly. Don't shy away from the cramp, go for the cramp and the triceps will adapt.
Prerequisites
If you have some V-sit conditioning already and can get your legs to about 45 degrees in your unassisted V-sit for at least a good 5-8s, then this variation may be worth trying out.
Setup
Setup by anchoring a resistance band to a pullup bar. From here, you'll want to sit ahead of the anchor point and begin to wrap the opposite end of the band around your feet. I don't recommend starting with the lightest band, but maybe the next level or two up. If the band is too light you won't be able to get your hips as high and the quality of work will be lower. You can work your way down over time. But I also don't recommend starting with the heaviest band. It can be quite easy to get aggressively thrown backward by the band. To prevent this, get ready to contract those triceps with your life and push the earth away with all your might. Do what you need to in order to prevent getting thrown back and your V-sit skills will develop.
Programming: 3-5 sets of 10-15s
2) Wall Assisted V-sit
Hip compression. I think of compression as the ugly beast of the V-sit. This is the element that crushes your soul when trying to keep your legs high in the air. At the end of the day, almost every V-sit exercise will have some element of compression. It's inherent to the movement. But compression is also a complicated thing. It's not as simple as just "bringing the legs towards the body". Compression requires two forces to maintain the hips in this tightly flexed position. One from the shoulders and triceps pushing the earth away and one from the hip flexors working to bring the legs close to the body. And in order to keep the legs tightly compressed to the body, it can be very helpful to fully engage and activate your leg muscles.
This is where we'll use the wall-assisted V-sit. The purpose of the wall-assisted v-sit is to educate the body on how to contract the quadriceps in a heavily compressed V-sit to keep the hips compressed. Most of our V-sit training up to this point will not have this level of compression. This variation exposes us to the demands of this extreme compression and teaches us how to use our legs to drive the compression.
Prerequisites
This variation does require a decent amount of hamstring flexibility. Moreso than the other two variations in the article. A fair prerequisite for this variation is a standing pike stretch with hands on the floor. While it can be done even without the most flexible hamstrings, it will not be as beneficial and there are other exercises that are more suited to your flexibility level.
Setup
Setup by starting with your hips high on the wall and your hands placed behind you at a distance that will challenge your compression but allows you to perform the exercise. If you set up with too much compression, it will be difficult to perform the exercise.
Once you're in the position, try to get your hips as high as possible by pushing strongly into the ground using your shoulders and triceps. From here, try to lift one leg off of the wall and closer to your body. Your body will naturally try to reduce the compression by leaning backward. Don't let this happen. Force the compression. To do this, you need to squeeze your quadriceps with your life. Don't sell yourself short here. Your quads are in charge of driving that compression. Hold your leg in the lifted position for the prescribed time and then repeat with the other leg.
It's important here to make sure it's a very active position. The idea isn't to rest on the wall. If it doesn't feel incredibly intense, you may need to think through the setup some more.
Programming
The key with the wall-assisted V-sit is to build up to 20-30s in the position. This is a long hold. It'll be uncomfortable and comfort in the position is what we're looking to build. This means that we can program this variation in many different ways. One prescription that I like to use is 3 sets of 2 lifts each leg, 4-5s hold each lift. Feel free to get creative with your prescriptions. One 10s lift on each side can also work, for example.
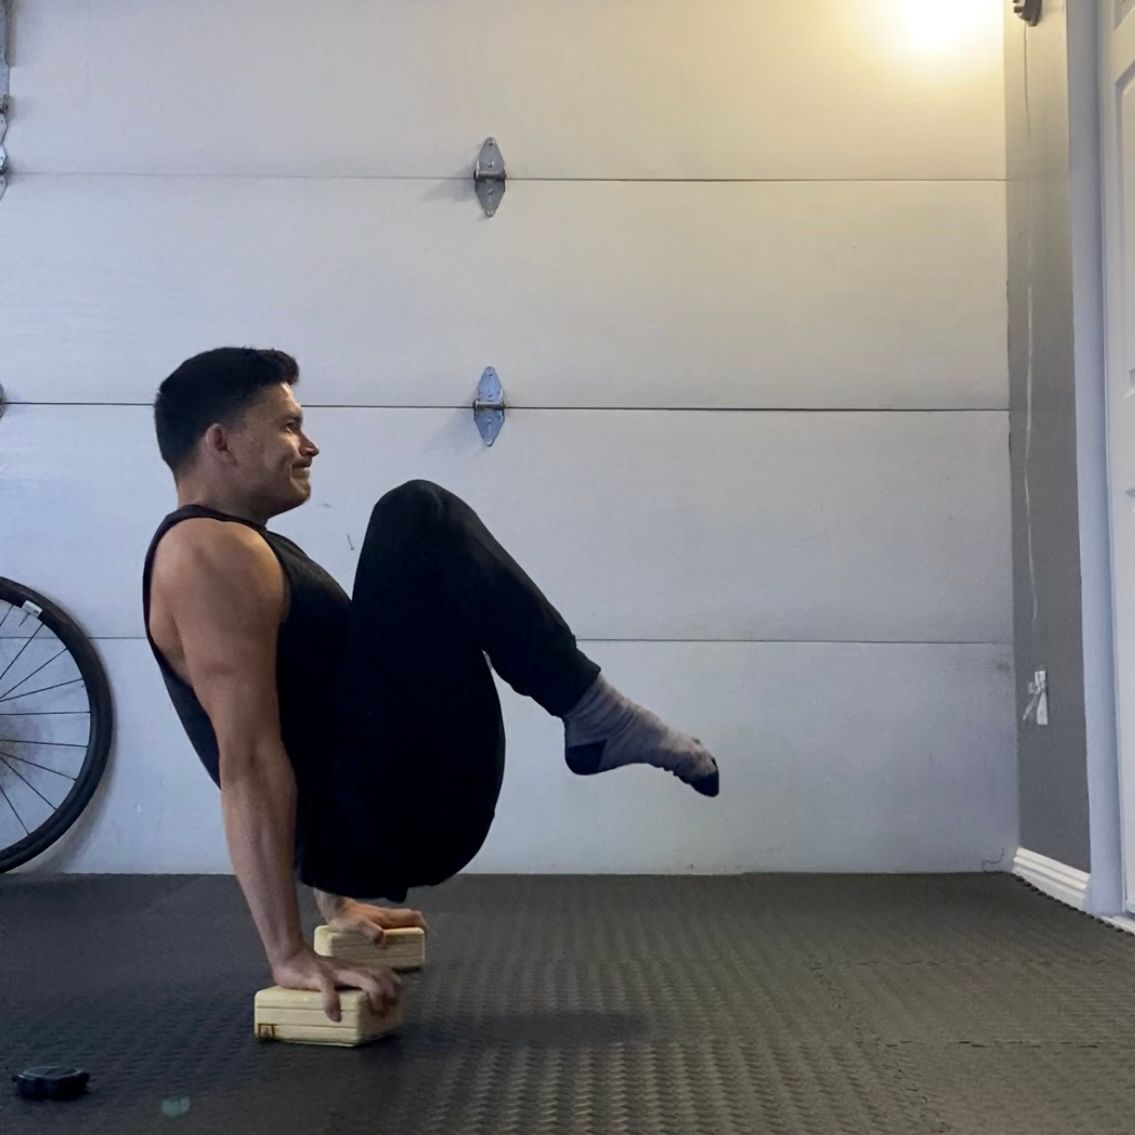
3) Max Effort Tuck V-sit
The V-sit itself is an isometric skill. And each of the variations described in this article are isometric exercises. And truth is, I love isometrics. They're brutal, yet beautiful at the same time. Beautiful because they're the best teachers for educating our muscles to perform the way we want them to perform. And the max effort tuck V-sit is a hell of a teacher.
This variation is different than a sub-maximal tuck V-sit, which can be useful for first getting exposed to the V-sit. The max effort V-sit is an all-out, balls-to-the-wall drill that should take everything out of you. My preferred way of using this variation is for those looking to improve their max V-sit hold times in the full, straight-leg position.
Starting with the legs tucked means that we can eliminate the hamstring flexibility demands and focus our efforts on tight compression and a strong tricep contraction.
Prerequisites
I'm also a huge fan of the max effort tuck V-sit because it can be used very early on in your journey. There are no prerequisites for a tuck V-sit. It can be used from day one. However, for the max effort tuck V-sit, I do recommend that you've had at least one training cycle where you trained the tuck V-sit at sub-maximal intensities. This will ensure your body is prepared for holding the position at near maximal intensities.
Setup
The setup is simple as it's just a standard V-sit with bent legs. However, there are two options here. One option is to perform the tuck with straddled legs and the second option is to perform the tuck with the legs held tightly together. The latter option will have more carryover to the full V-sit as the legs are held together there.
However, when first starting to train the tuck V-sit, it can beneficial to start with a straddled tuck. The straddled tuck will be less demanding, meaning that you'll be able to hold it for a longer time. Early on, getting longer hold times is helpful for conditioning the body to the demands of the V-sit. If you can't hold the tuck with legs together for more than 10s, I recommend starting with the straddled tuck.
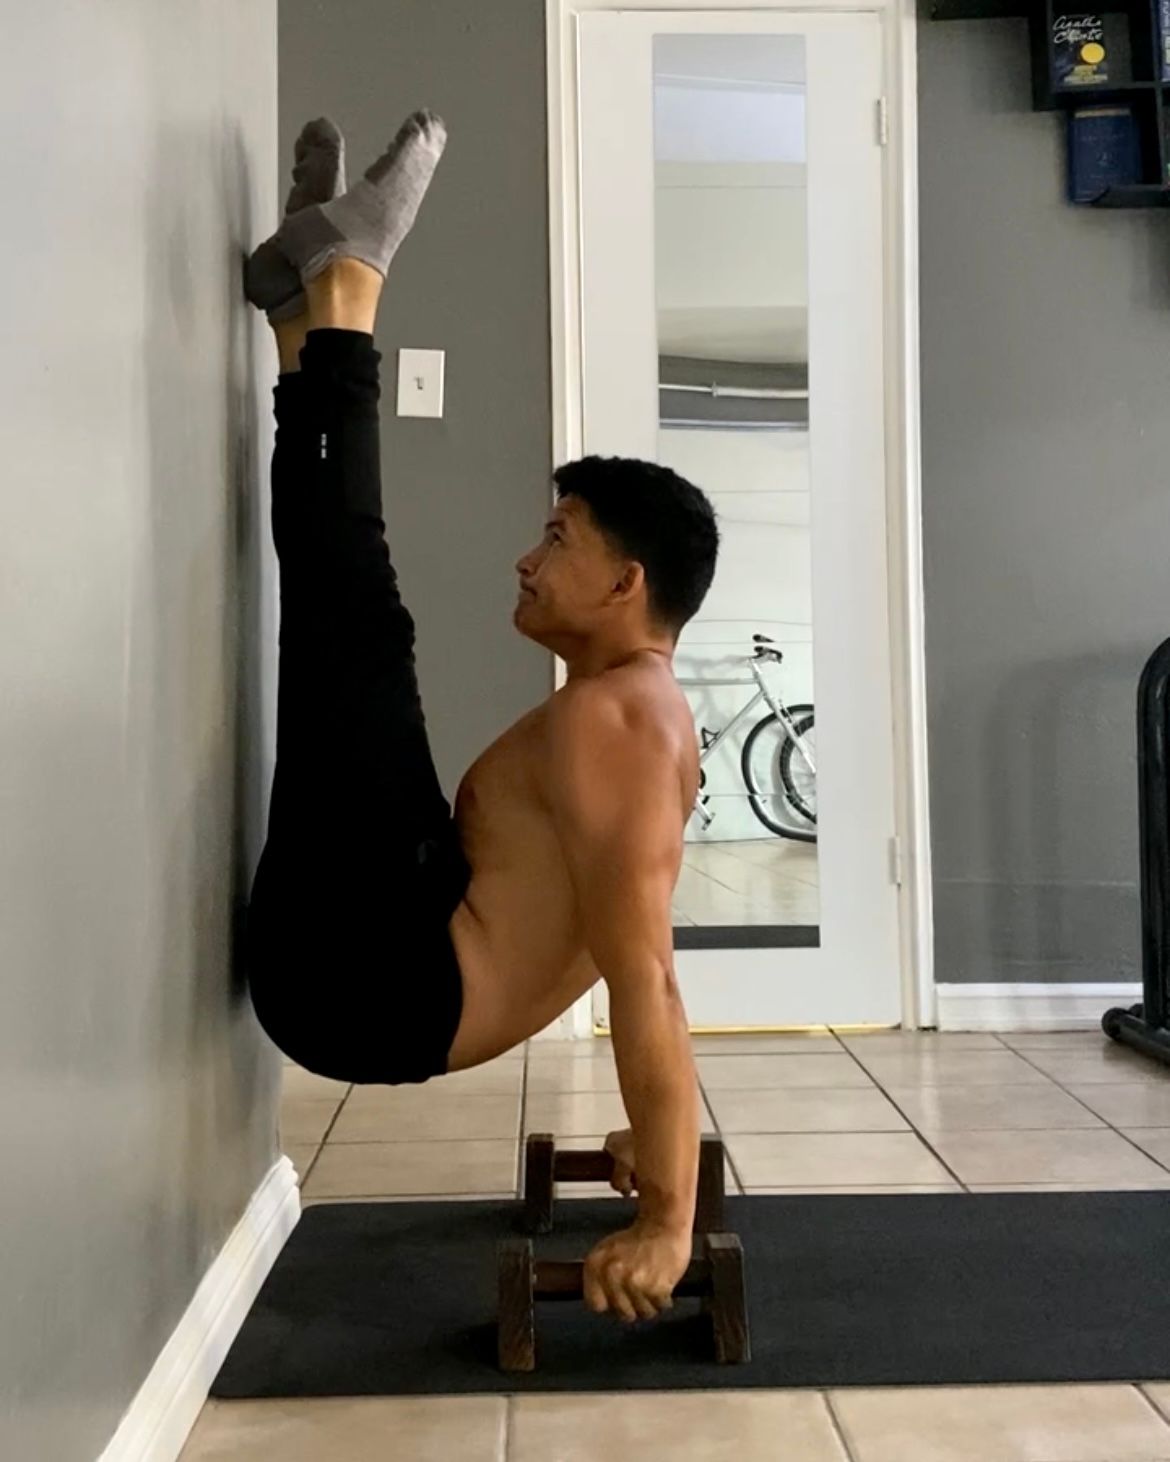
The primary intention should be twofold. Get the hips as high as possible and tuck your legs into your body as hard and tight as you can. Notice in the picture below how much I'm pointing my toes. It may seem irrelevant, but engaging the entire lower body is a requirement for maximum compression to happen. There really shouldn't be any relaxed body parts. It's not called "max effort" for nothing.
Programming
3-5 sets of max hold - minimum 10s
Conclusion
When it comes to building an iconic, highly compressed V-sit, it's important to not only work the full position. In fact, I find it almost essential to work variations of the full position. Variations allow us to work the V-sit at intensities that will provide an adequate stimulus to provide the adaptations we're looking for. This article covered three variations, their individual setups, prerequisites, and programming tips. The three variations covered are the banded V-sit, the wall-assisted V-sit, and the max effort tuck. Working each of the variations on separate cycles throughout your journey will place you in a more advantageous position for unlocking the V-sit compared to only training it in the full position. I wish you luck, friends! The V-sit journey is a humbling one.
If you enjoyed this article, I encourage you to subscribe to my weekly newsletter, The Sunday Spread, where I share free resources, training tips, discounts on my coaching services, student highlights, as well as my personal interests like podcasts, books, and worthwhile videos. You can sign up by hitting the button below!