2 Advanced Bridges Variations to Level-Up Your Backbends
The purpose of this article is to provide 2 advanced bridge variations to progress your backbend journey
In the world of backbends, the bridge is the ultimate representation of what it means to have superior flexibility through the spine, shoulders, hips, and wrists. But bridges don't have to end at your standard wheel with both hands and feet on the ground and the traditional arch shape across the entire backside of the body. Each element of the body can be tinkered with and manipulated to create new and artistic bridge shapes. Manipulating the body in the bridge, however, requires a very high degree of shoulder and thoracic spine flexibility. And due to this there are prerequisites that need to be met in order to train the advanced variations safely.
Advanced Bridge Prerequisites
Since each of the variations covered below are advanced variations of the bridge, I strongly recommended having experience training the traditional bridge performed on two feet, as well as experience with active backbend exercises like the active cobra or standing arch. Not having this experience can place you at risk of injury.
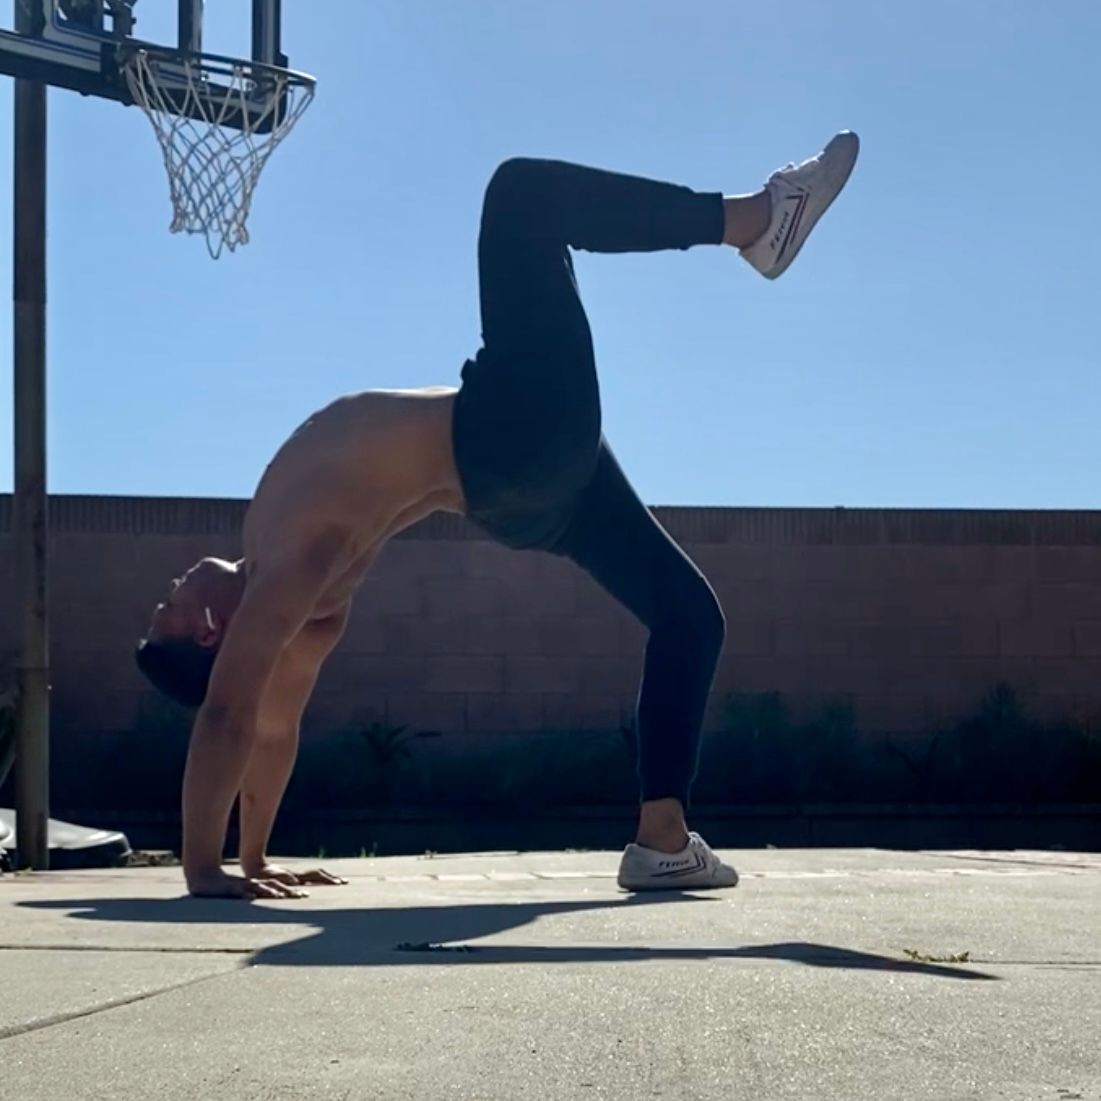
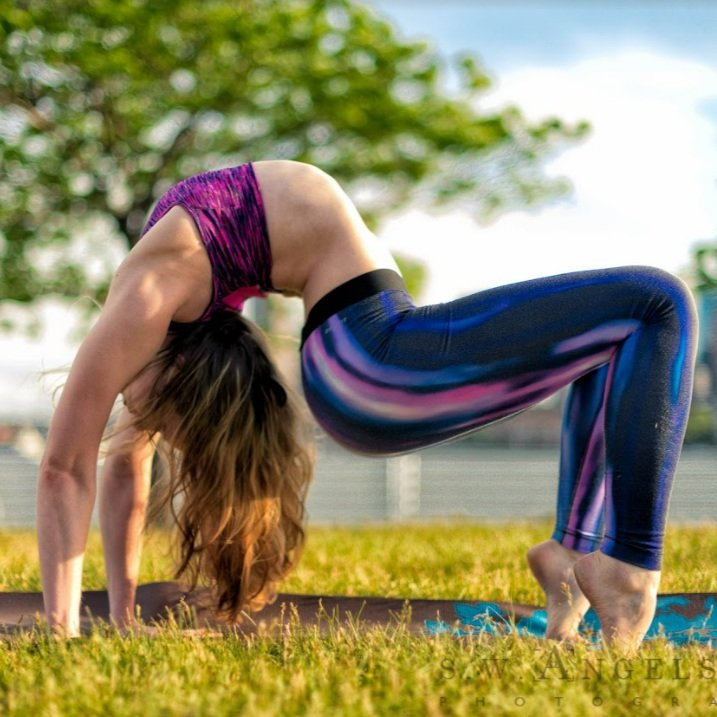
1) ~20-30s Full ROM bridge. The first prerequisite is being able to hold a standard bridge at or near your max range of motion for about 20-30s at an intensity that would allow you to sustain a conversation. All I mean is that you want to feel comfortable in your bridge and not feel like it's a soul-crushing position to hold. If you're constantly moving around in the position or lacking confidence in your hand, shoulder, and feet position, then you may need to spend more time here before moving on.
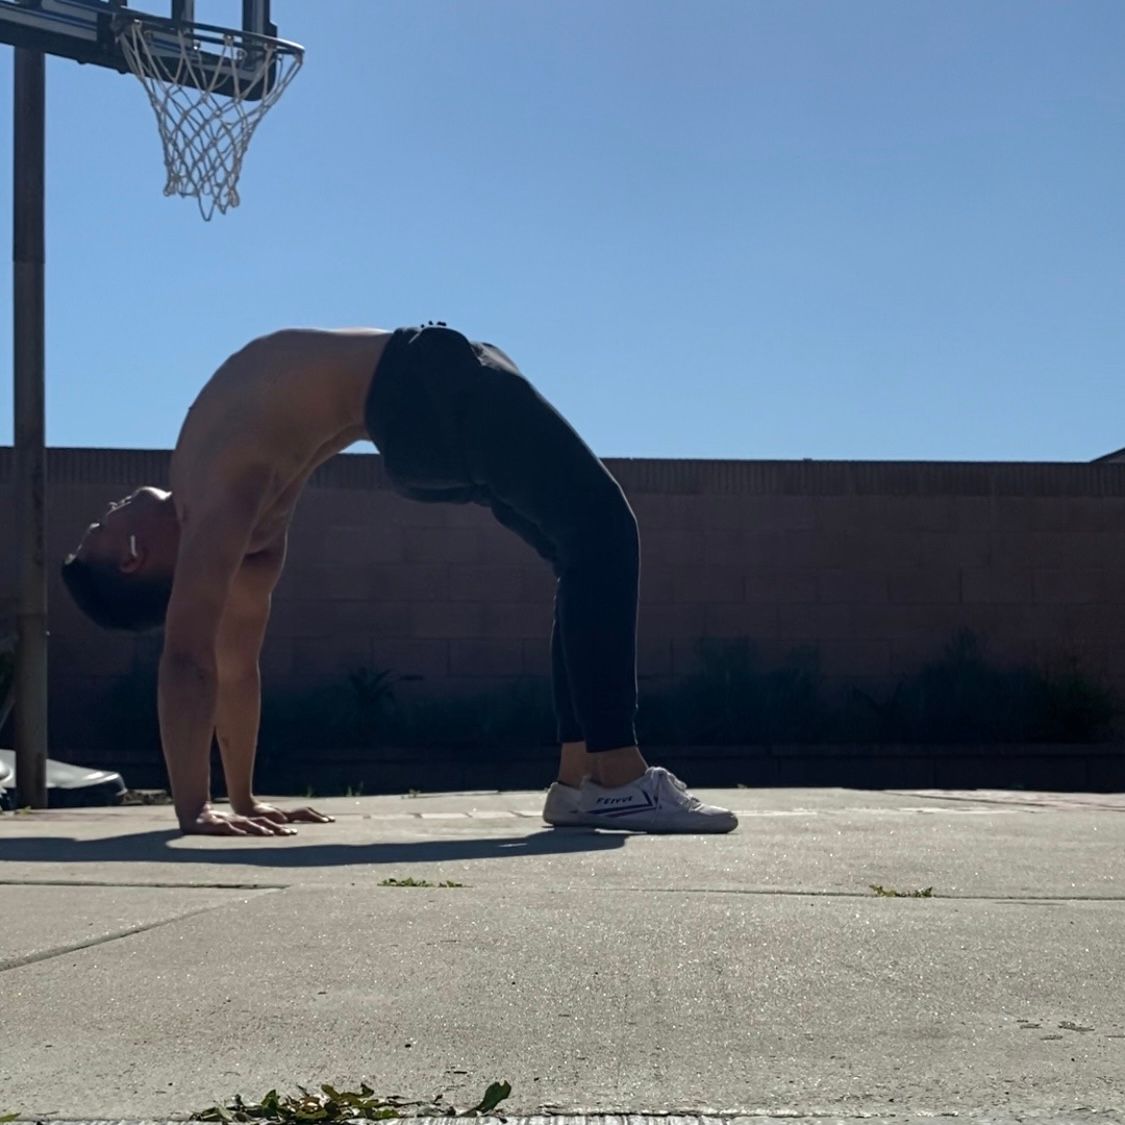
Full range of motion here is the shoulders being roughly in line with the wrists, as seen in the picture below, or slightly less. Having the shoulders positioned too far in front of the wrists places the wrist in a more compromising position due to the added wrist extension. This can cause problems in the advanced variations.
*It doesn't have to be the deepest bridge as the variations themselves will provide a new stimulus for progress to occur. More importantly, is how strong and comfortable you feel near the end range.
2) Active Backbend experience
Having experience training your active flexibility in backbends is critical for the advanced variations. Firstly, the active flexibility component of backbends trains our strength and ensures that we have a thorough understanding of how to contract our back muscles while in a backbend, especially the muscles of our thoracic spine. Contracting our back muscles to get deeper into a stretch can't happen without a powerful hip extension and the active flexibility variations of backbends are phenomenal at educating the body on how to do this. There are many valid variations that will work here, but two that I recommend are the Active Cobra or Standing Arch. We're primarily looking for control in getting in and out of the positions and a demonstration of strength. 10s of active cobra or 3-4, 5s holds in the standing arch. I recommend you to check out my recent blog article to learn and get tips about the Active Cobra.

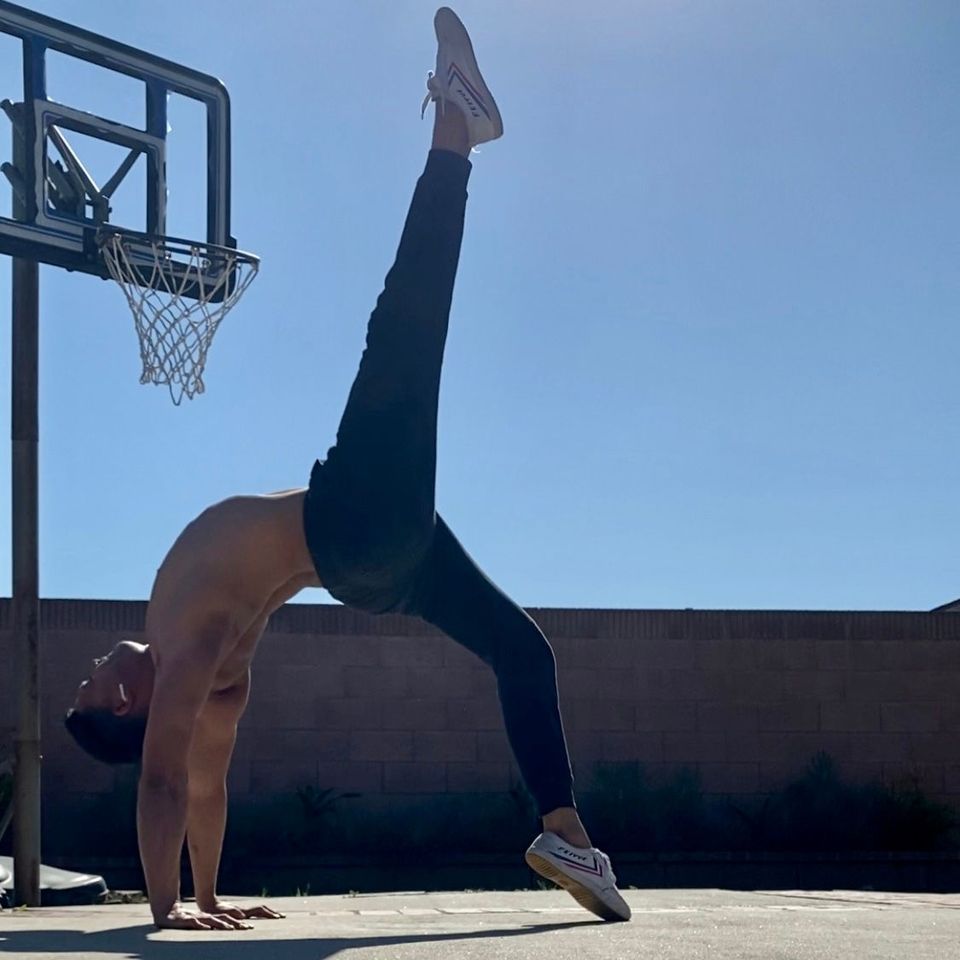
1) Single Leg Bridge
The single-leg bridge, or one-legged bridge, is an extraordinarily alluring position. A beautiful arch gets formed across the entire posterior chain and depending on your hamstring flexibility, also shoots up a beautiful leg high in the air. While beautiful, it also comes with its challenges.
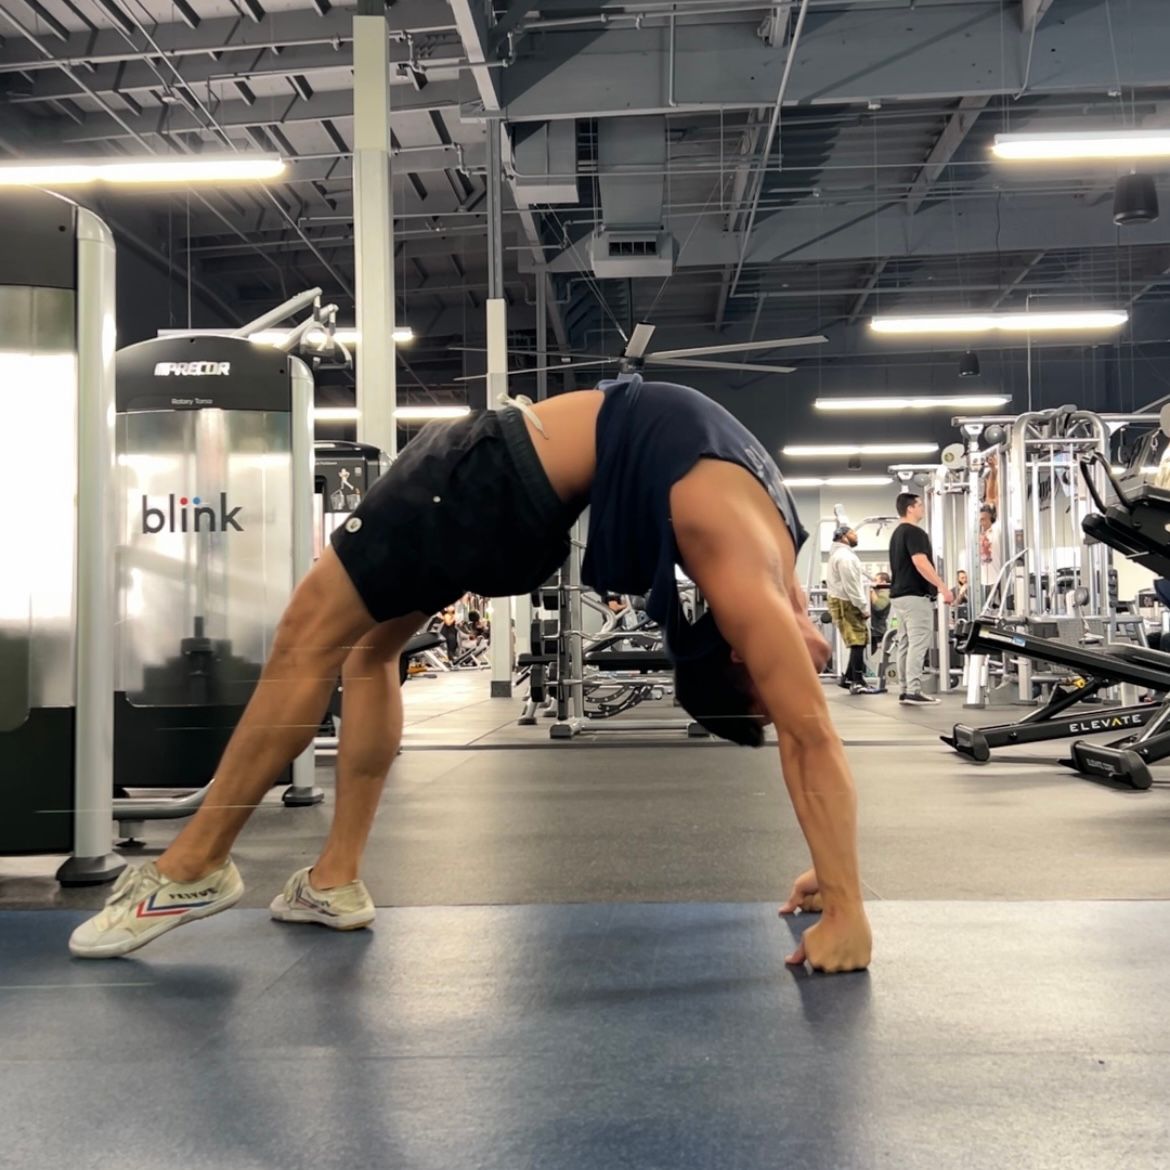
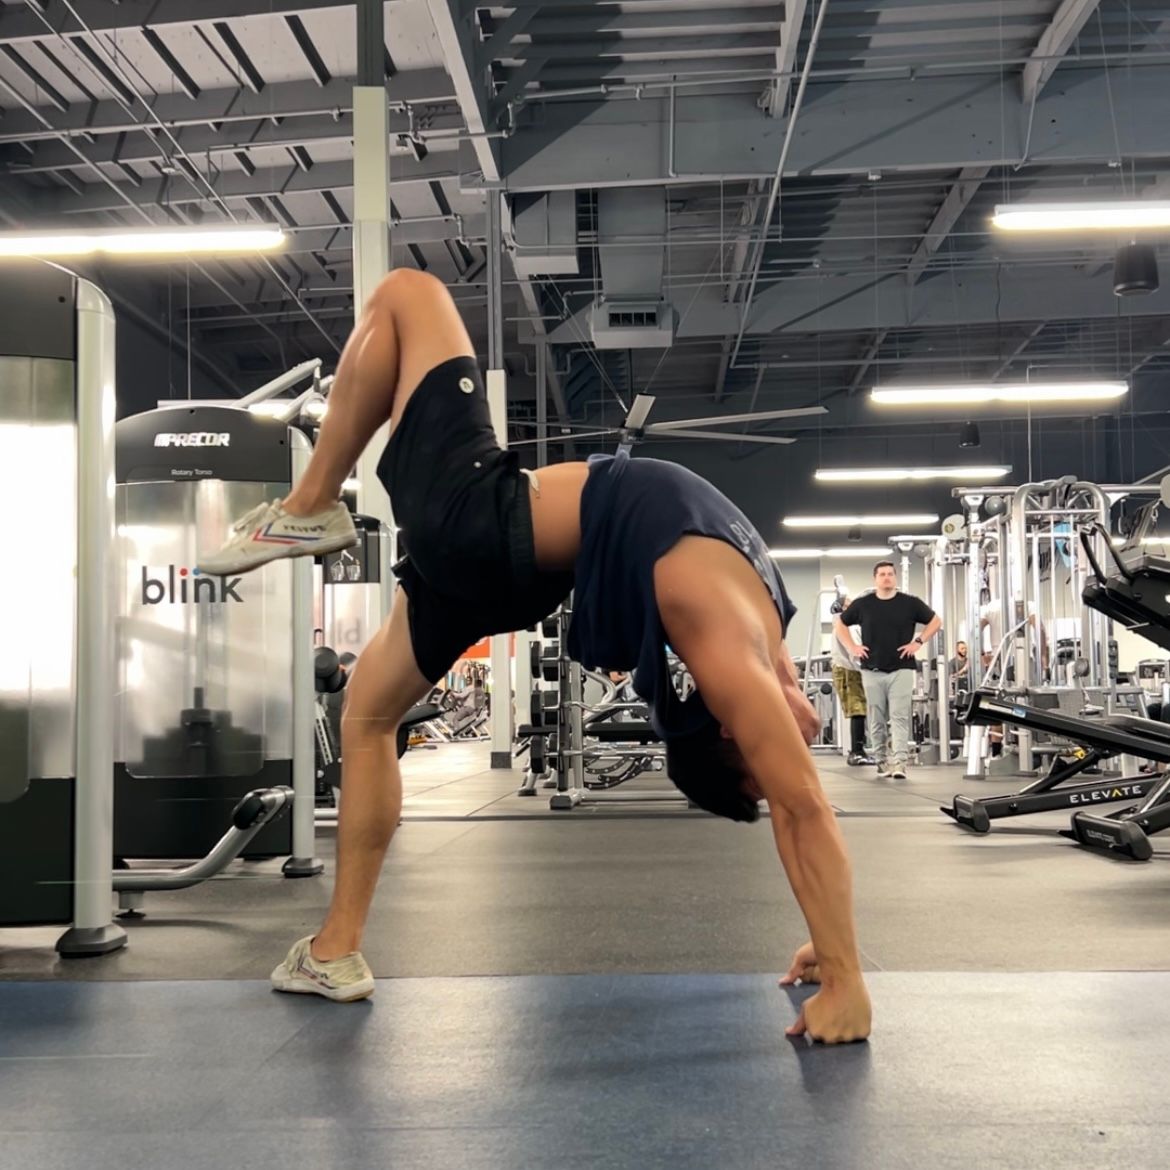
The primary challenge with the single-leg bridge is not allowing the shoulders to drift in the direction of the feet as the foot begins to come off of the floor. You can see what I mean in the pictures below. In the picture on the left, I'm near my end range of motion with my shoulders stacked over my wrists and ready to lift my foot off the ground. However, as soon as I lift my foot, my shoulders drifted forward. You can see this in the second picture. My shoulders are now well in front of my wrists. This places the wrists and lumbar spine in a less advantageous/ compromising position.
Setting the shoulders correctly is the number one form setup to get right in the single-leg bridge.
The shoulders drifting forward is caused by either not having enough single-leg glute strength, or the supporting foot isn't pushing hard enough into the ground. So to prevent this from happening, we'll outline the steps we can take to get into the bridge in a way that doesn't allow the shoulders to shift forwards.
1) Get into your bridge and set your shoulders. Lock them in place. This is done primarily by the glutes, so contract them as hard as you need to.
2) Shift your weight from both feet onto one. You can do this gradually and not all at once. Imagine your foot getting lighter and lighter until it's just touching the floor.
3) From here, you want to straighten the working leg out in front of you like in the first picture below. This step is often omitted by people performing single-leg bridges. While it's not absolutely critical to do to get into the final position, I do like to use it when first learning the position. The main reason is that straightening the leg out in front is a challenging position to hold, therefore if you can hold your leg out in front without your shoulders moving, you'll be able to hold the single-leg bridge with no problem.
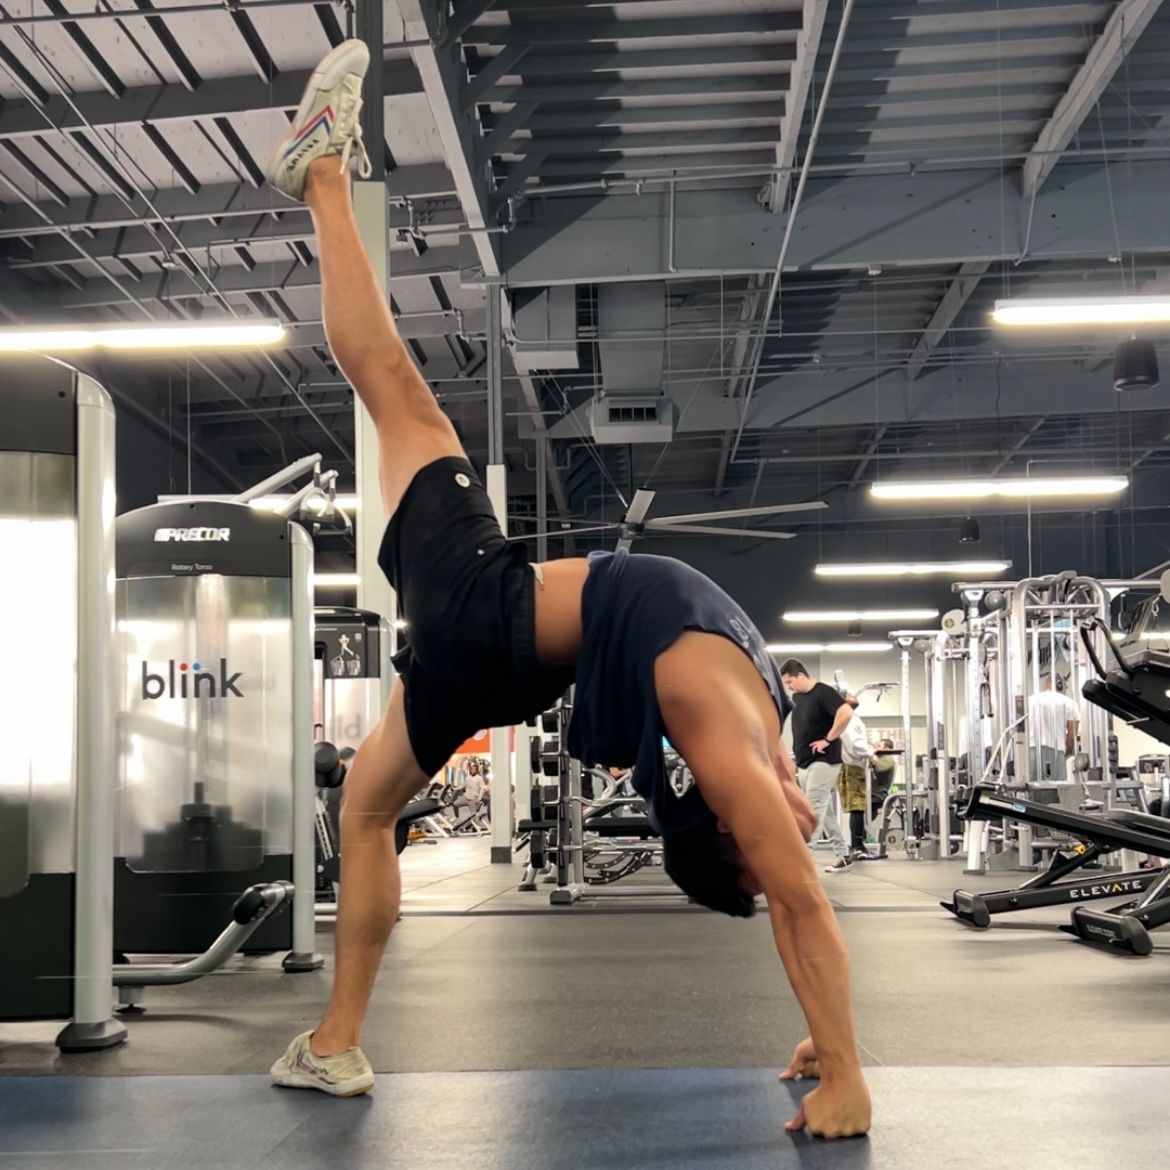
4) It's time to lift the leg! There are two options here. One option is to lift your leg with a bent knee and then straighten out the knee once you reached your max hip flexion. This is the easier and less intense version and can be seen in the second picture below. And the second option is to lift the leg while keeping the knee locked the whole time.
If you find that glute strength is what you're lacking, working on this element in isolation may be worthwhile for progressing here.
Programming
The single-leg bridge can be trained dynamically or statically through repetitions or holds. Or both! 3-5 sets of 3-5 reps +10s hold
2) Chair-Sit Bridge
The chair-sit bridge is exactly what it sounds like. Get into a bridge and sit the hips down! The picture below is a beautiful representation of what the chair-sit bridge can develop into for an advanced practitioner.
The chair sit can be a pretty tricky position to get into. It requires a large degree of flexibility in the t-spine and shoulders as well as the proprioception to move only the hips while in a bridge.
Dropping the hips comes with its challenges. In the single-leg bridge, the challenge was not letting the shoulders drift upon lifting the foot. In the chair-sit, the main challenge is keeping the chest/ribs high as the hips drop down.
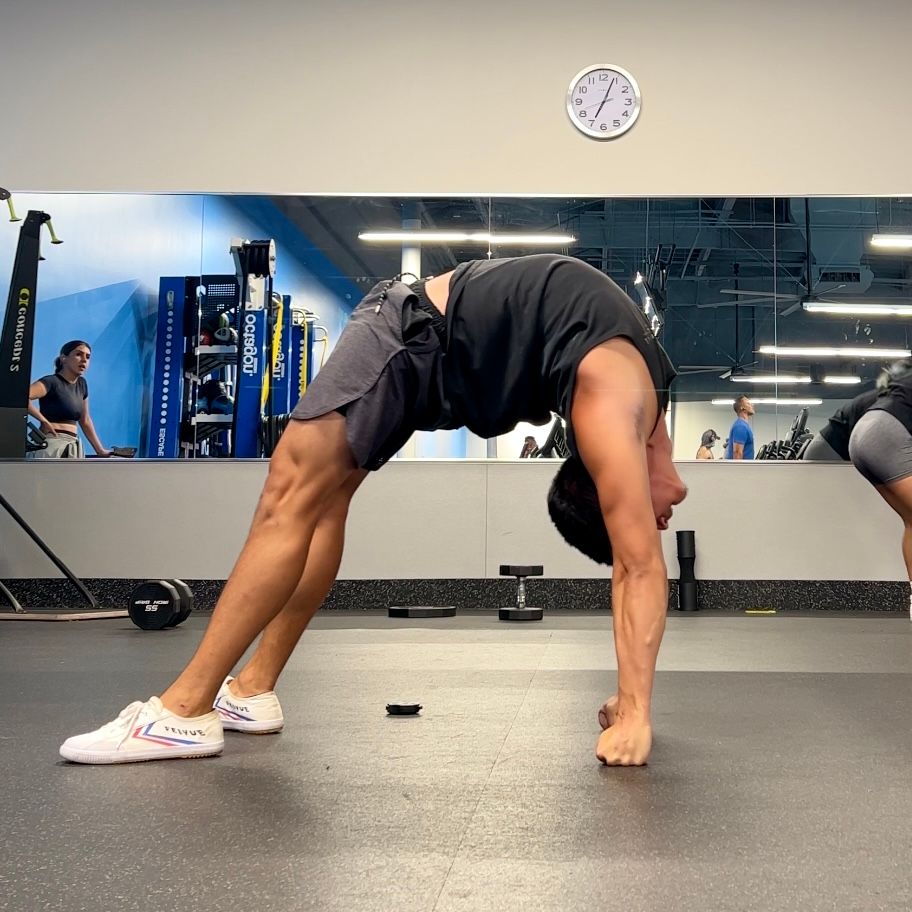
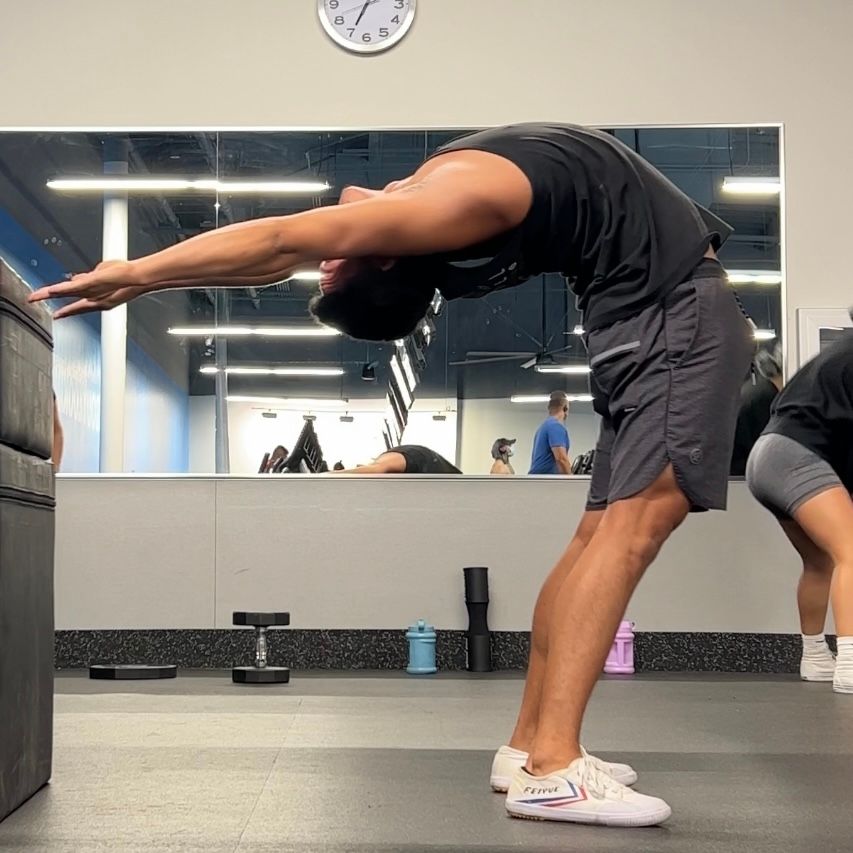
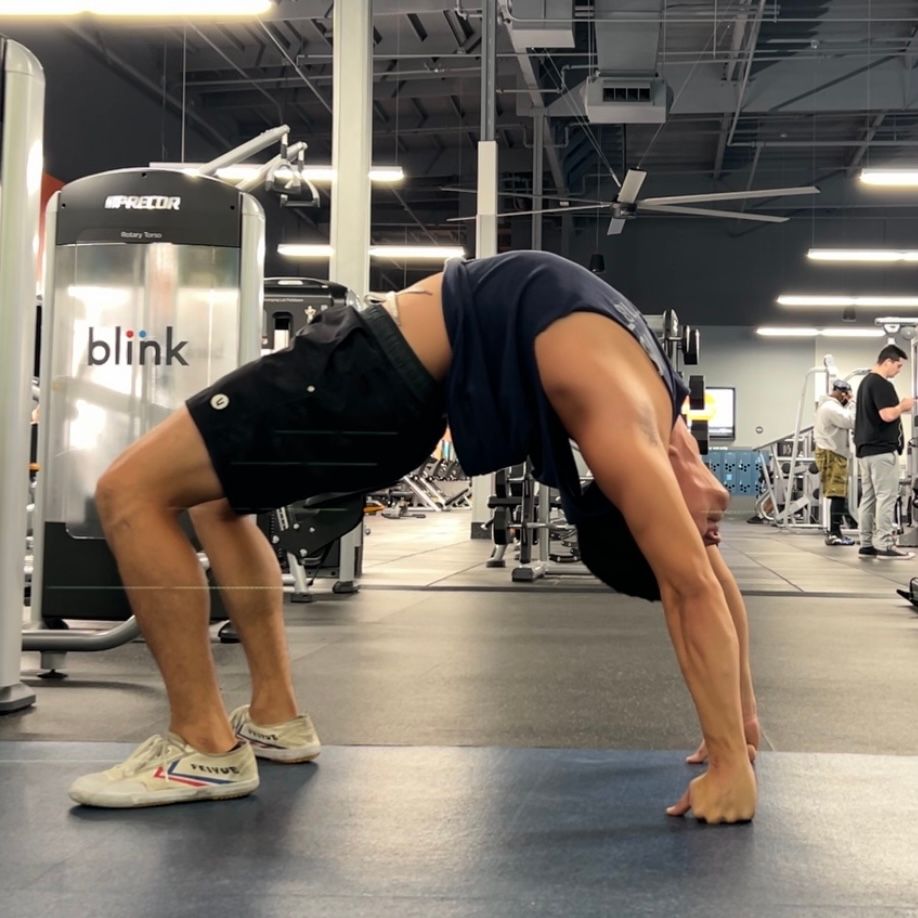
Before training the chair sit, and even before trying it, it's a good idea to train the coordination of the hips. This can be done in a few different ways. One interesting point is that the chair sit is fundamentally very similar to the Backbend Over Support. In the backbend over support (seen in the picture below on the right), we train the ability to bend along different points of the thoracic spine by "sitting" the hips down and back towards the object we're bending over. Therefore, having practical experience with the backbend over support will have a considerable carryover to the chair sit. It will help teach the coordination of the hips. Sitting the hips with a support on the back is an ideal regression or prep drill to facilitate the sitting of the hips without the chest dropping. The chest not dropping as the hips come down essentially means that there is sufficient flexibility in the t-spine for it to bend and allow the hips to sit.
Instead of performing the backbend over support for static holds, it can be done for repetitions of hip drops. 3 sets of 5-10 hip drops is a good starting point.
Once the hip drops have been trained in the backbend over support for some time, they can be progressed to training them in the bridge itself. Or for a slightly regressed version, the hip drops can also be trained in a headstand bridge.

Programming
After developing the coordination to drop the hips, it's time to start working on static holds. These holds are intense so a good idea is to begin with multiple short holds as opposed to one long hold. 3 sets of 3-5 reps each with a 5s holds.
Variations
Once the hips come down and can hold for time and you've found comfort and strength in the position, there's an endless amount of even more advanced variations! Some of them include: widening the feet, elevating feet onto heels, crossing the legs, and bringing the head through the shoulders. Let your artistic side run wild!
Conclusion
Once you've built up comfort with the traditional and more common back bridge, it's time to level up your backbend practice and begin exploring advanced bridge variations. This article explored two advanced variations. The single-leg bridge and the chair-sit bridge. Each comes with its own unique challenges and its own unique strength, flexibility, and coordination demands. But both are worth exploring once the correct prerequisites are in place.
If you enjoyed this article, I encourage you to subscribe to my weekly newsletter, The Sunday Spread, where I share free resources, training tips, discounts on my coaching services, student highlights, as well as my personal interests like podcasts, books, and worthwhile videos. You can sign up by hitting the button below!